24 Budget Birthday Party Ideas That Look Expensive
Let’s get one thing straight: a great birthday party has nothing to do with your budget and everything to do with how you use it. I’ve been to $500 parties that felt forgettable and $50 parties that felt magical. The difference? Intentional styling, a few smart tricks, and knowing where to spend vs. where to get creative. That’s exactly what this list is about — 24 genuinely good ideas that make guests say ‘wow’ without making your bank account say ‘goodbye.’
1. DIY Balloon Garland Backdrop
Let’s start with the one thing that makes every party photo look like it cost a fortune — a balloon garland backdrop. You don’t need a fancy balloon artist (or their invoice) to pull this off. Grab a bag of assorted balloons in your color scheme, a balloon arch strip, and some fishing line. Blow them up at different sizes and cluster them together. The uneven, organic look is actually what makes it pop on camera — so your ‘mistakes’ are basically features. 🙂
Here’s the secret nobody tells you: balloon garlands photograph 10x better than you’d expect and guests genuinely think you hired someone. Set it up behind the cake table or gift station, and it instantly becomes your party’s focal point. Total cost? Usually under $15 if you shop at a dollar store or grab a bulk balloon bag online. FYI, metallic gold and white balloons mixed in with pastel ones elevate the whole vibe without adding much cost.
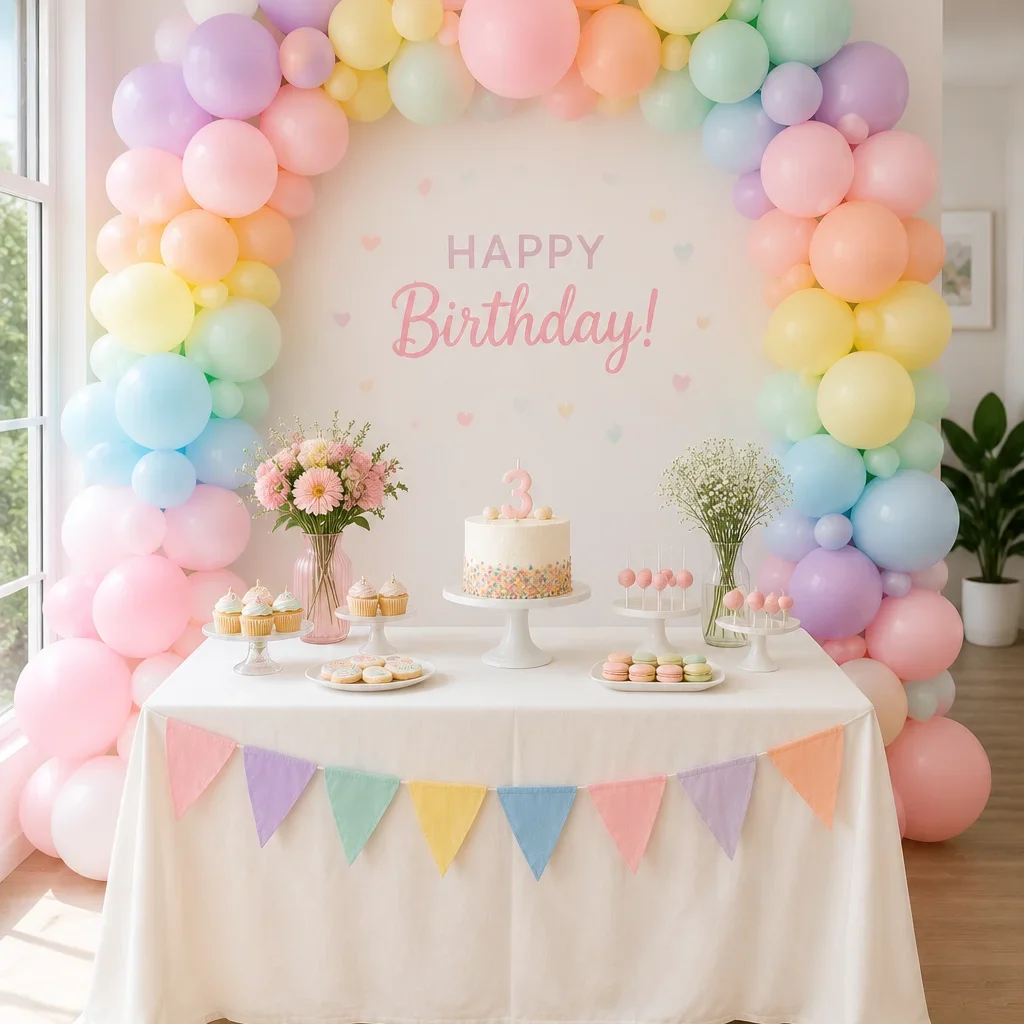
2. Dessert Table Styled With Risers
A flat dessert table looks sad. A styled dessert table with varying heights looks like something out of a Pinterest board. The trick? Use whatever you have at home — stacked books, shoeboxes, upside-down bowls — and cover everything with your tablecloth. Nobody can see what’s underneath, and suddenly your cupcakes and cookies look like they belong in a bakery display.
Arrange taller items at the back and shorter ones at the front so that everything remains visible. Add a simple printable banner above (more on that later) and a few dollar-store candle holders for filler, and you’ve got a dessert table that looks wildly expensive. The whole setup relies on height variation — once you understand that trick, you’ll never lay things flat again. IMO, this one tip alone changes everything about how parties photograph.
3. Printable Party Decorations
Printables are the single best budget party hack out there, full stop. You pay a few dollars (or nothing) for a digital file, print at home or at a local print shop, and suddenly you have a cohesive party theme with matching banners, cupcake toppers, water bottle labels, and table signs. The visual consistency is what makes everything look intentional and expensive — not the actual cost of materials.
Search Etsy or Pinterest for free or affordable birthday printable sets. Match the colors to your party theme and print everything on cardstock for that sturdy, professional feel. Laminating cupcake toppers is an underrated move — they hold their shape and don’t get soggy. For the banner, use a hole punch and twine to string it up. Easy, fast, and genuinely cute. Total cost per item? Basically pennies.
4. A ‘Fancy’ Cake With Store-Bought Base
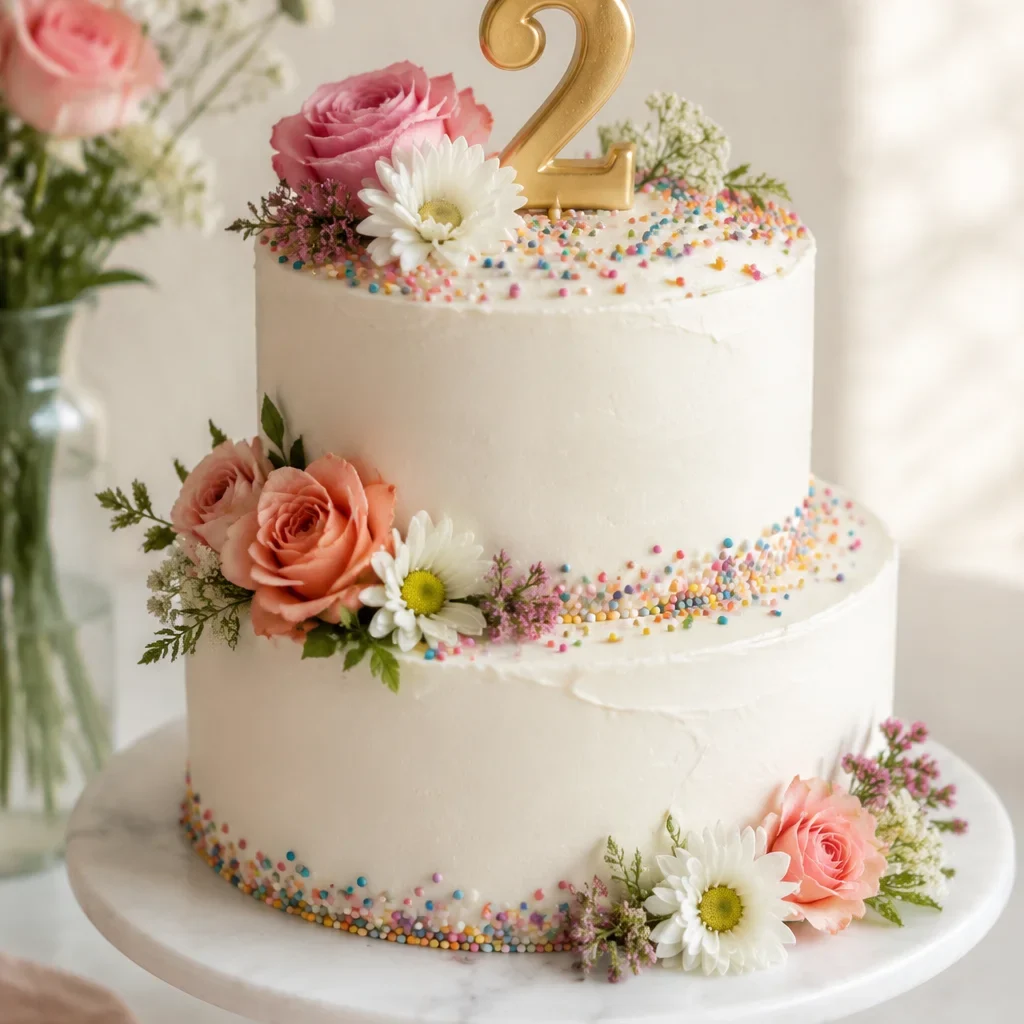
Nobody needs to know the cake started as a plain grocery store sheet cake or a box mix. What makes a cake look high-end is the decoration, not the recipe. A smooth layer of white buttercream (even from a can), a ring of fresh grocery-store flowers around the base, and a gold number candle on top? That’s a cake people will photograph before they eat. And isn’t that the whole point?
Fresh flowers are the easiest way to elevate a cake — simply cut the stems short and gently push them into the frosting. Roses, baby’s breath, and eucalyptus are cheap and look gorgeous. If flowers aren’t your thing, a sprinkle cascade down one side works just as well. Get a fancy cake stand from a dollar store or thrift shop, and your humble little cake suddenly looks like it has a $75 price tag. Chef’s kiss.
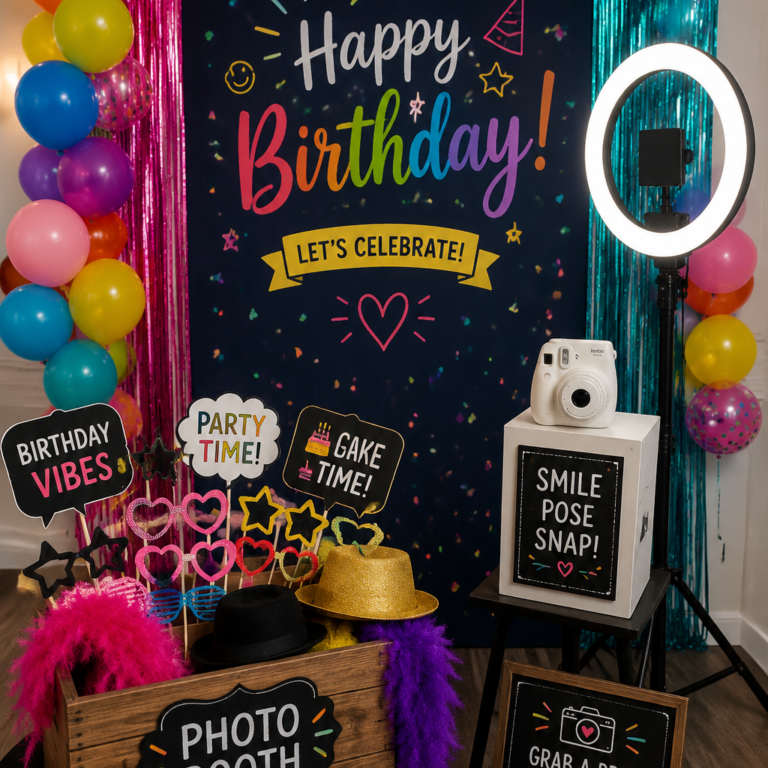
5. DIY Photo Booth Corner
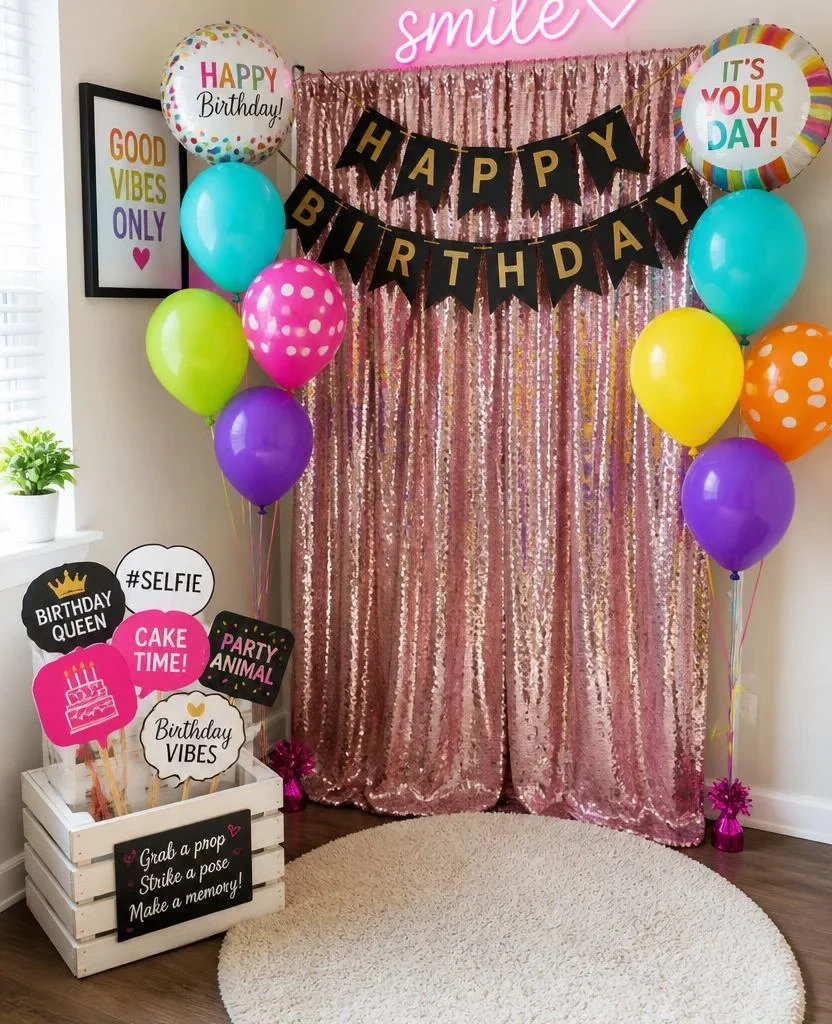
A photo booth is one of those party additions that guests absolutely love but costs almost nothing to set up. Hang a metallic fringe curtain or a simple paper flower wall as a backdrop (both are under $10 at party supply stores), add a few balloons on either side, and plop a small basket of props nearby. Printed props like speech bubble signs, silly glasses cutouts, and ‘birthday squad’ banners take about 15 minutes to make.
The beauty of a photo booth is that guests create the entertainment — you just build the stage. Set up a ring light on a tripod (or just position it near a window), and people will naturally gravitate toward it. You’ll end up with a full camera roll of fun photos that double as party memories. Honestly, half the time, the photo booth is more fun than the actual planned activities. Not complaining.
6. Personalized Party Favors on a Budget
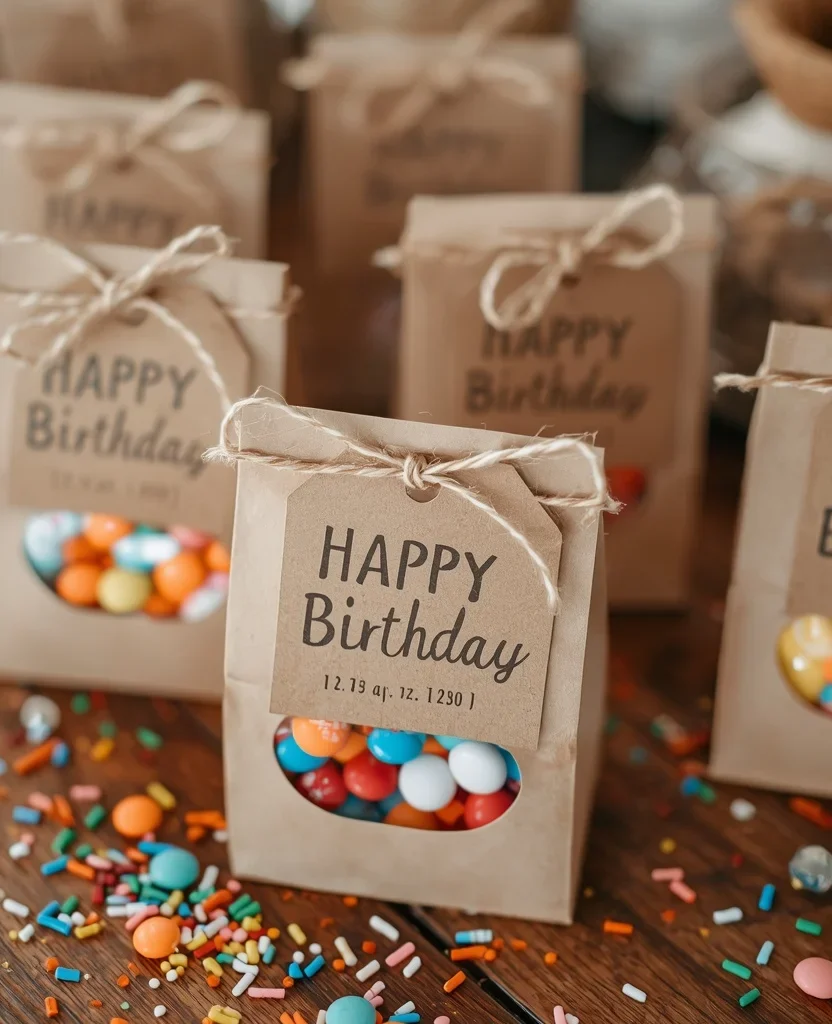
Party favors don’t need to be elaborate — they just need to feel personal and thoughtful. A small, clear bag or kraft paper bag filled with a few pieces of candy, a little trinket, and a personalized thank-you tag already feels like a curated gift. The tag does most of the heavy lifting here. Print them at home with the guest’s name and a fun little message, and the whole thing looks custom.
Some easy, low-cost favor ideas: a mini succulent in a plastic cup (gorgeous, memorable, cheap), a small cookie in a cellophane bag, a packet of hot cocoa mix, or even a handwritten bookmark for a book-themed party. The trick is wrapping or tagging everything consistently — same ribbon, same color scheme — so it all looks like part of the party rather than a last-minute grab from a gas station.
7. Tissue Paper Pom-Poms as Décor
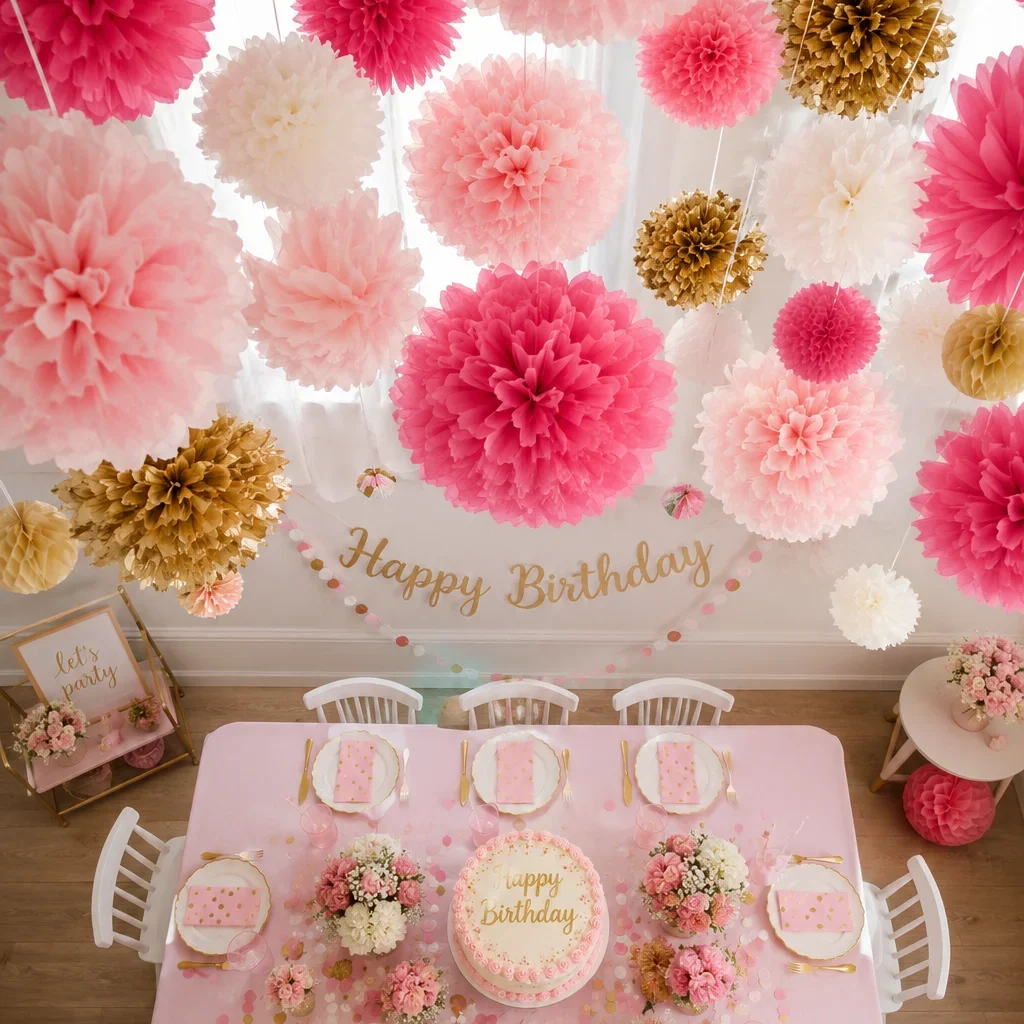
Tissue paper pom-poms are possibly the most underestimated party decoration on the planet. Each one costs about 50 cents to make, takes five minutes, and hanging a bunch of them from the ceiling transforms any room into a proper party space. Vary the sizes — big ones for drama, small ones to fill in gaps — and stick to two or three colors for a cohesive look.
Stack eight to ten sheets of tissue paper, accordion-fold the whole stack, tie a piece of wire in the middle, trim the ends into rounded or pointed shapes, and then gently pull each layer apart toward the center. That’s literally it. Use fishing line to hang them so the string disappears and the poms look like they’re floating. Guests consistently notice ceiling décor, and this trick costs almost nothing to pull off.
8. DIY Flower Centerpieces

Florist-made centerpieces are beautiful and wonderfully expensive. You know what’s also beautiful and costs about $4? Mason jars filled with grocery-store flowers. Grab a mixed bouquet from your local grocery store, split it into three or four groups, trim the stems, and drop them into small jars. Wrap the jars with twine, a strip of burlap, or a ribbon that matches your theme, and you’ve got centerpieces that look intentionally rustic and styled.
If flowers feel like too much effort, greenery-only arrangements are just as striking and even cheaper. Eucalyptus, ferns, and simple leafy branches from your backyard (yes, seriously) look beautiful in a cluster of glass jars. Add a candle or two alongside the jar, and suddenly you have a tablescape. Ever wondered why styled tables in magazines always look so good? Height variation and greenery. That’s the whole secret.
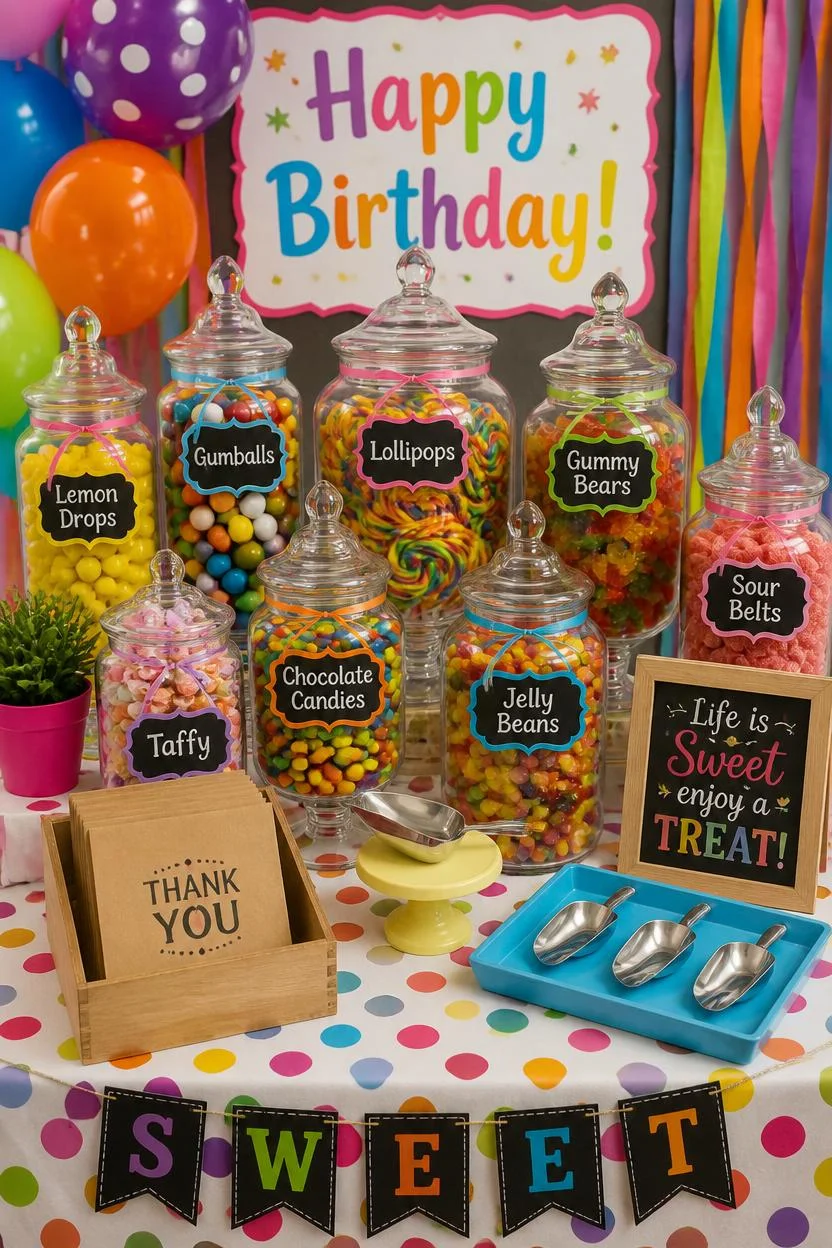
9. A Fun ‘Candy Bar’ Station
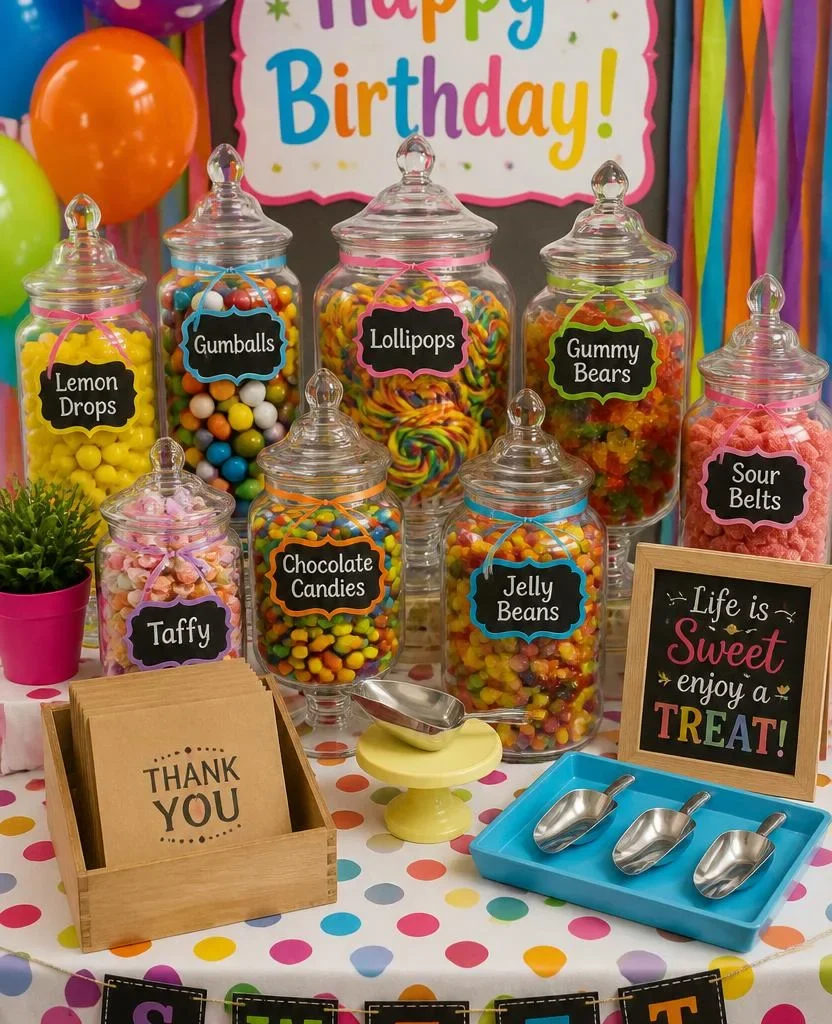
A candy bar station is one of those setups that guests genuinely get excited about at any age. The key is presentation: use clear glass jars or apothecary-style containers and fill each one with a different candy. Layer taller jars at the back and shorter ones in front, add small scoops or tongs, and set out little bags for guests to fill. It looks luxe. It costs maybe $20 in candy.
Coordinate the candy colors with your party theme for maximum visual impact. Pink and gold party? Fill jars with pink gummies, white chocolate drops, and gold-wrapped caramels. The color coordination is what elevates it from ‘pile of candy’ to ‘curated candy station.’ Label each jar with a small tent card or handwritten tag, and you’re done. Thrift stores and dollar stores are gold mines for the right glassware.
10. Ceiling Streamers for Visual Drama
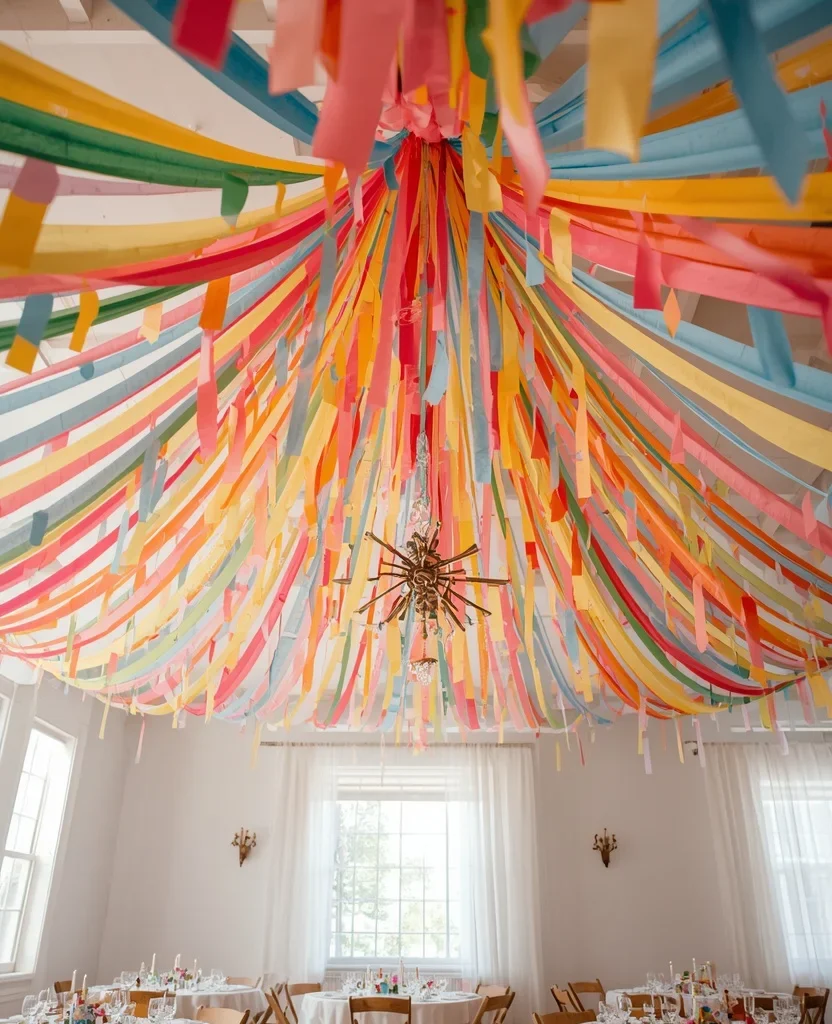
Crepe paper streamers are criminally underused. When you hang them from a single center point on the ceiling and drape them outward to the walls, you create a full canopy effect that makes a party room look transformed. This technique costs less than $5 in streamers and about 20 minutes of setup time. The visual impact is completely out of proportion with the effort involved.
Mix two or three complementary colors for a more dynamic look. Twist pairs of streamers together before hanging them if you want extra texture. You can also frame a dessert table or stage area by hanging streamers vertically behind it as a simple backdrop. Crepe paper is one of those party staples that’s been around forever because it genuinely works — and at that price point, you can afford to go big.
11. Themed Tableware on a Budget
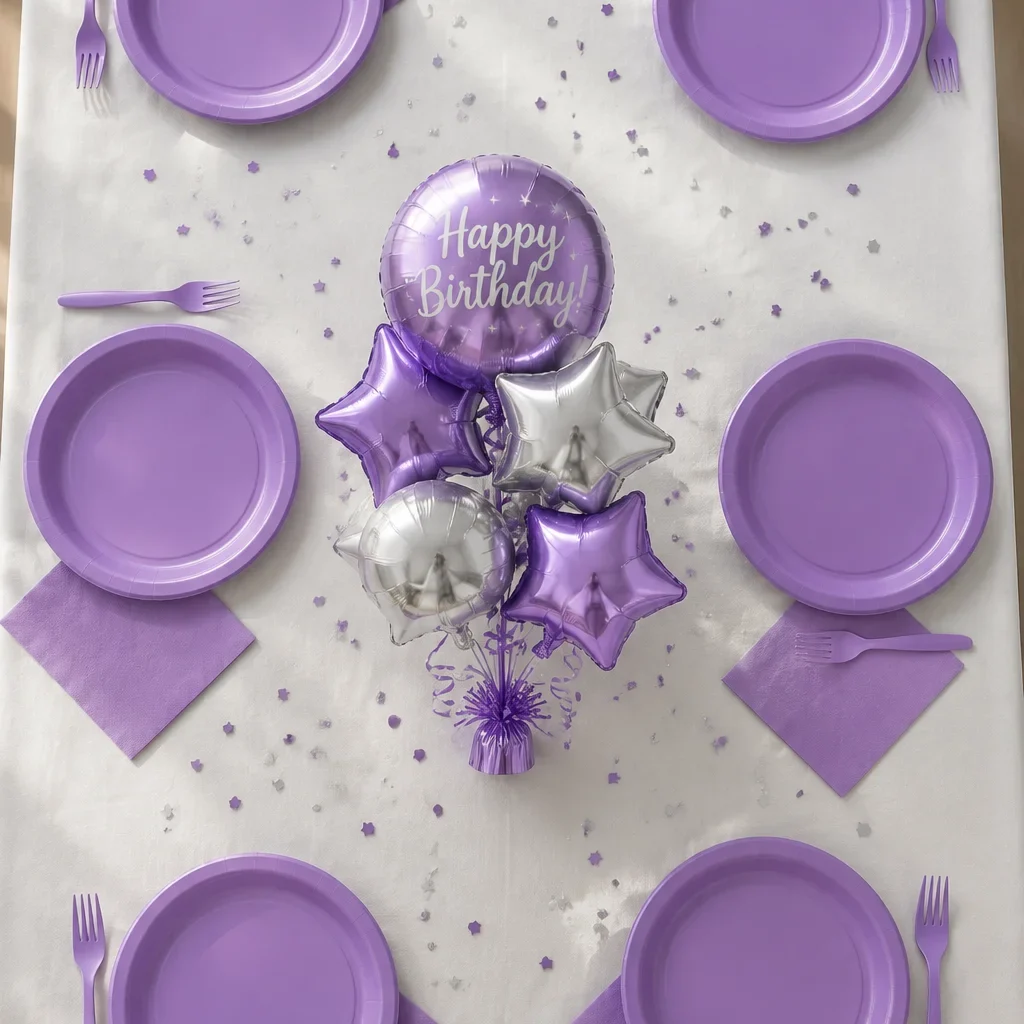
Forget buying an expensive themed tableware set — the logos wear off in your hands anyway. Instead, go for solid colors and coordinate them thoughtfully. A table set with matching solid-color plates, napkins, and cups in two or three complementary colors looks more elegant than a busy character-printed set. Dollar stores carry solid-color tableware in almost every color, and it photographs beautifully.
Add a metallic element — gold or silver plastic cutlery, a metallic tablecloth, or foil plates — and the whole table immediately looks more polished. Layer a white tablecloth under a metallic runner for a two-toned table look that’s simple but visually rich. The goal is coordination, not complexity. When everything on the table shares a color story, it looks styled on purpose.
12. DIY ‘Happy Birthday’ Banner
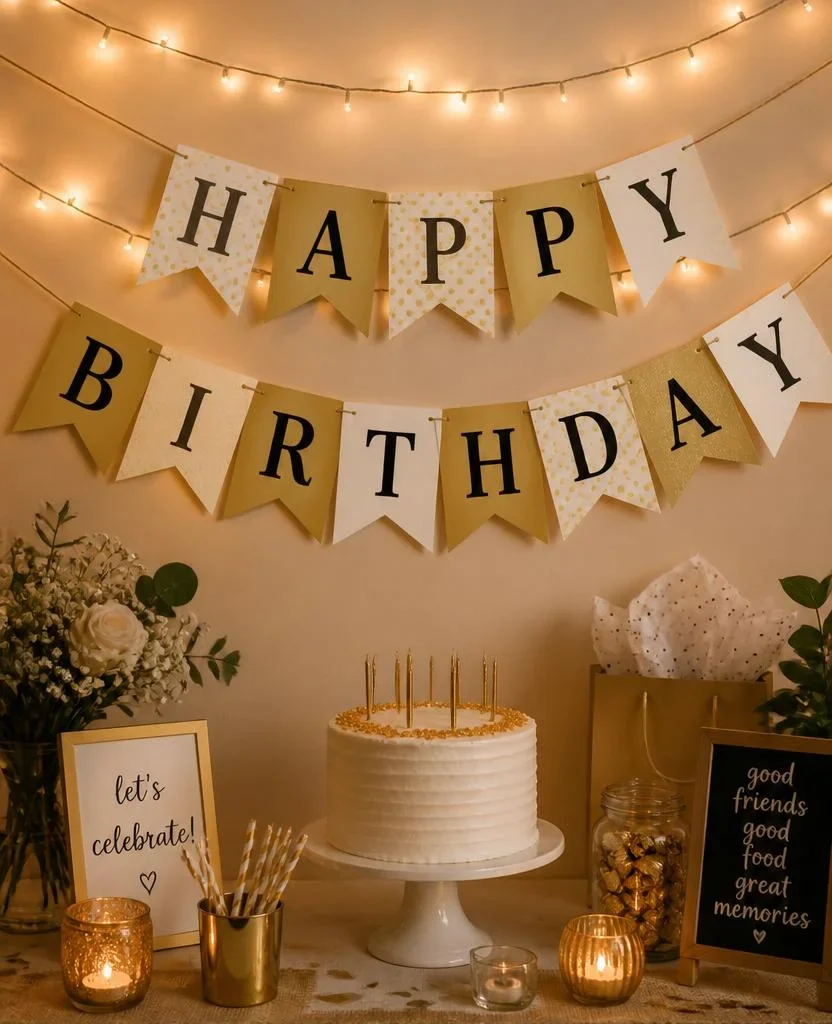
A DIY banner is one of those crafts that looks impressive and takes about 30 minutes to make. Cut triangles out of cardstock or patterned scrapbook paper, write or stamp one letter per flag, punch a hole in each top corner, and string them on twine. Done. The handmade quality actually adds charm — guests notice the personal touch, and it looks intentional rather than rushed.
If cutting and lettering sounds like too much work during party week, just print a banner template from Pinterest and cut it out. Cardstock runs through most home printers fine. Use a gold or metallic cardstock for a premium look that nobody will guess came from a home printer. Hang it with mini clothespins on twine for extra style points. This is one of those decor pieces that gets noticed and photographed every single time.
13. Fairy Lights Everywhere

Fairy lights make everything better. Warm white string lights draped behind a dessert table or along the ceiling create an instant ambiance upgrade that no amount of colorful decorations can replicate. The warmth and glow they add to a party space photographs beautifully and makes the entire room feel more intentional. Get a set at a dollar store or a basic outdoor string light set — both work perfectly.
Use them in creative spots: inside a clear vase with tissue paper for a glowing centerpiece, strung behind a sheer curtain for a dreamy backdrop, or wrapped around a wreath form as a table accent. They’re endlessly versatile and reusable for every party you throw. Once you start adding fairy lights to parties, you’ll wonder how you ever decorated without them. Small investment, massive return.
14. Budget-Friendly Ice Cream Bar
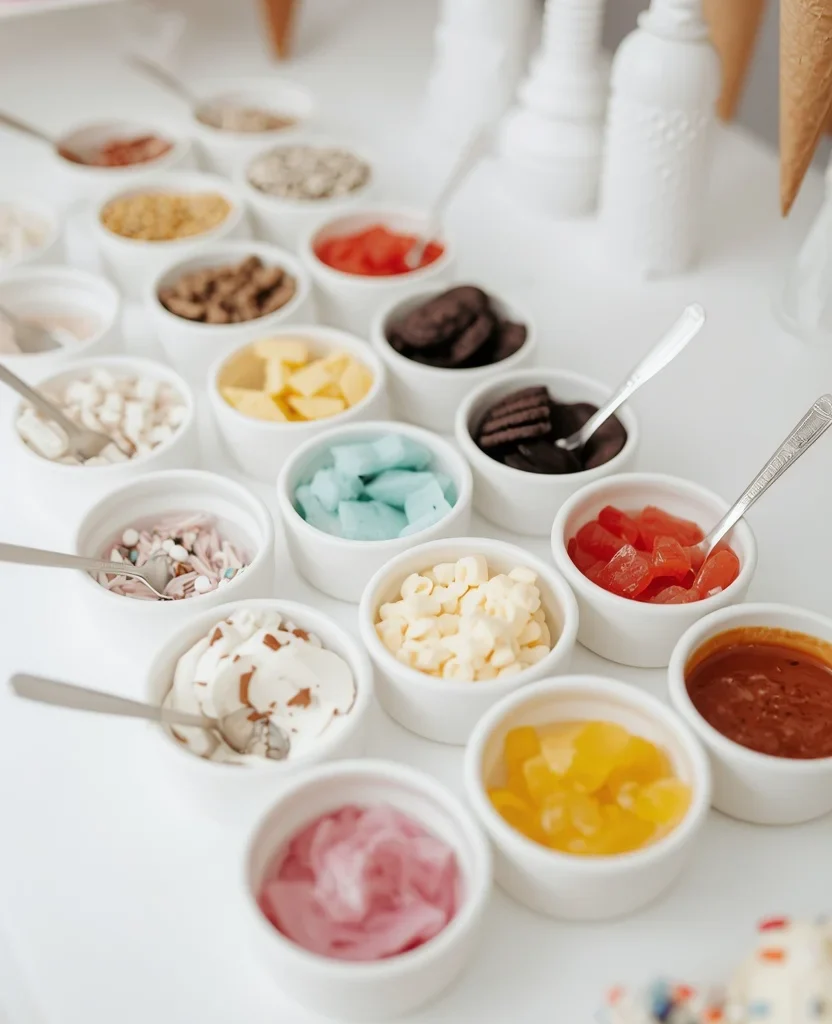
An ice cream bar is a crowd-pleaser that works for every age and costs a fraction of a catered dessert. Pick up two or three tubs of ice cream (vanilla, chocolate, and strawberry cover everyone), set out small bowls of toppings, and let guests build their own. The interactive element is what makes it special — people love assembling their own dessert. It also means no cutting, no serving, and no stress for you.
Toppings can be as simple as sprinkles, crushed Oreos, chocolate sauce, and whipped cream. Label each bowl with a cute little tent card and arrange everything neatly on your table. Add a small chalkboard sign that says ‘Sundae Bar,’ and you’ve created a dedicated station that feels thoughtful and fun. The whole setup costs maybe $30–40, and it’s honestly the part of the party that guests talk about afterward.
15. Outdoor Lawn Games Station

If you’re throwing a party at home with outdoor space, a lawn game station is free entertainment — especially if you already own any yard games. Cornhole, ring toss, giant Jenga, bubbles, hula hoops, and sidewalk chalk cost very little and keep guests (kids and adults alike) engaged for hours. Set up a dedicated game area with a simple sign and a bucket of equipment, and the party basically runs itself.
The key is making the station look intentional rather than thrown together. Use a chalkboard sign or a printed ‘Game Zone’ sign, keep equipment in a basket or crate, and add a few balloons nearby to mark the area. Even a simple string of bunting above the game area makes it look like part of the party design. Guests will spend more time at the game station than almost anywhere else — and it costs you practically nothing.
16. Balloon Number Centerpiece
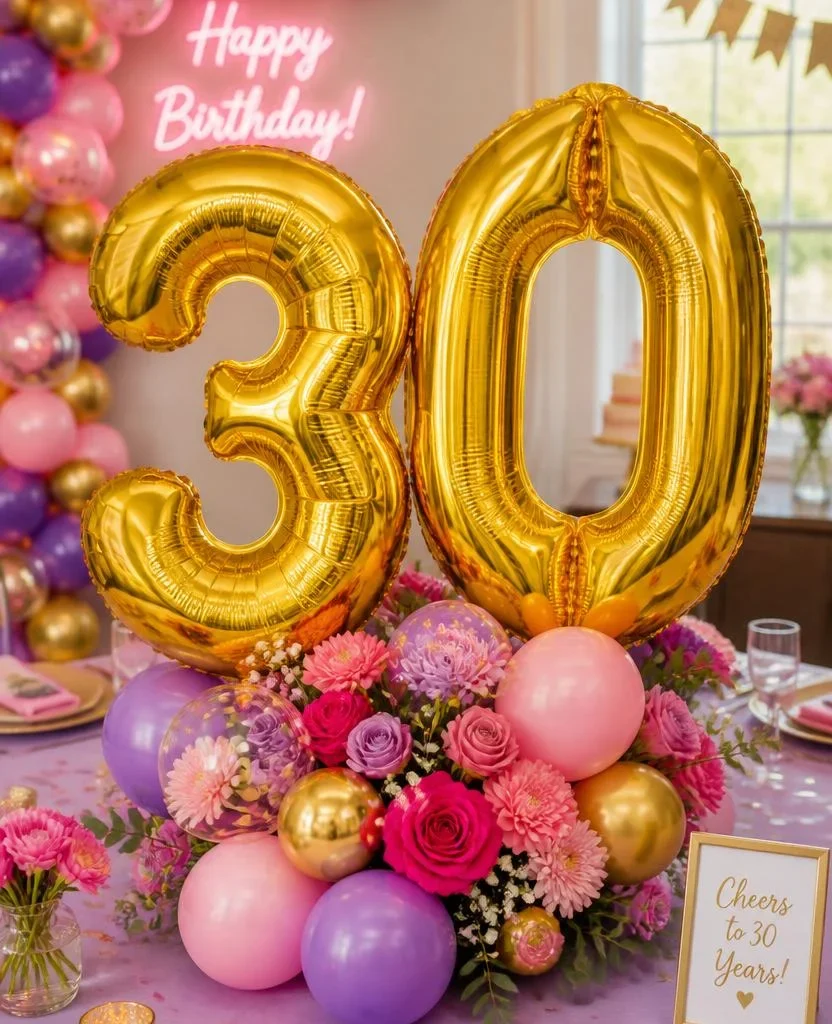
Giant foil number balloons are incredibly affordable (usually $2–5 per number), and they make an instant statement. Use the birthday person’s age as a centerpiece for the main table — it’s instantly personalized and requires zero styling skill. Add a few regular balloons in complementary colors around the base, and you have a fully decorated focal point. They also double as excellent photo props.
You can find foil number balloons in gold, silver, rose gold, and pretty much every color at party supply stores or online. Mix a number balloon with a star or heart shape on either side for a more dynamic arrangement. If your party has a name theme instead of age (like ‘Queen’ or a character name), spell out a word instead. These balloons always look expensive in photos, and nobody needs to know you spent $8 total.
17. DIY Photo Garland
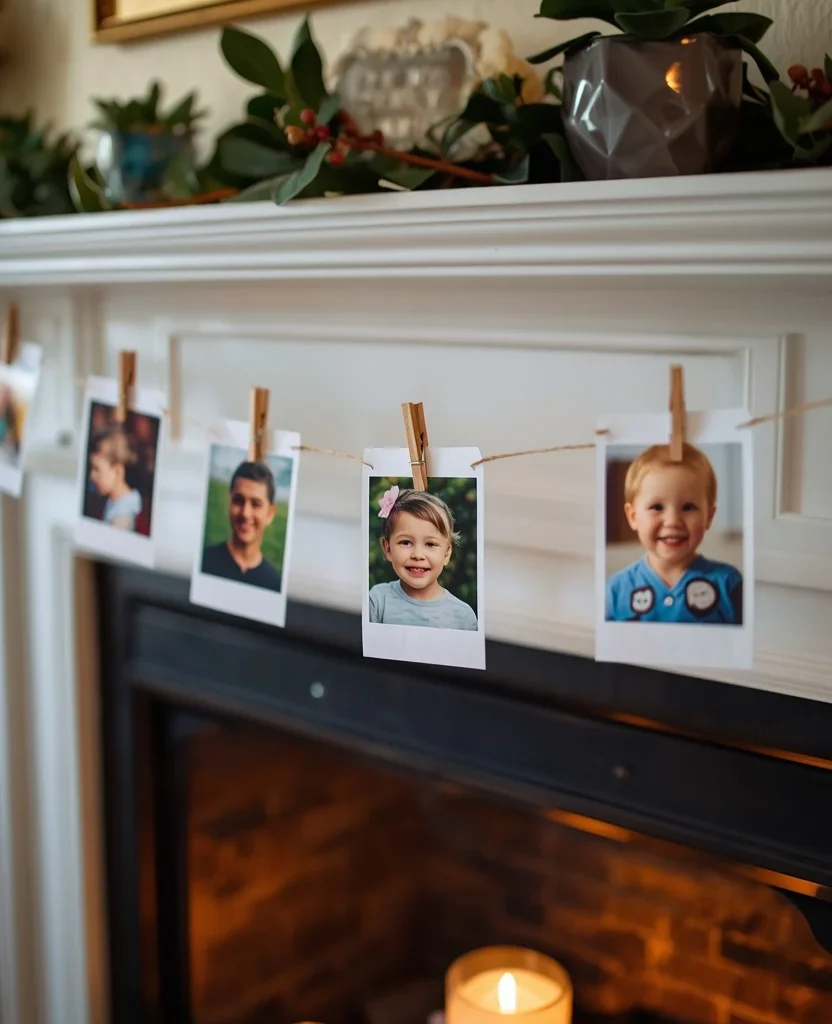
A photo garland is one of those personal touches that makes guests stop and smile every single time. Print a selection of photos of the birthday person — one from each year of their life, or just favorites — clip them to a piece of twine with mini clothespins, and hang it above the fireplace, along a wall, or behind the dessert table. It’s sentimental, beautiful, and essentially free if you have a home printer.
Print photos in either color or a mix of color and black-and-white for a curated editorial look. Add some greenery or small flowers clipped in between the photos to make the garland feel fuller. This decoration works for milestone birthdays, especially (first birthday, 16th, 21st, 40th, 50th), because the photos tell a story. It’s the kind of thing guests photograph and comment on — and it costs maybe $3 in printer ink and clothespins.
18. Themed Snack Labels
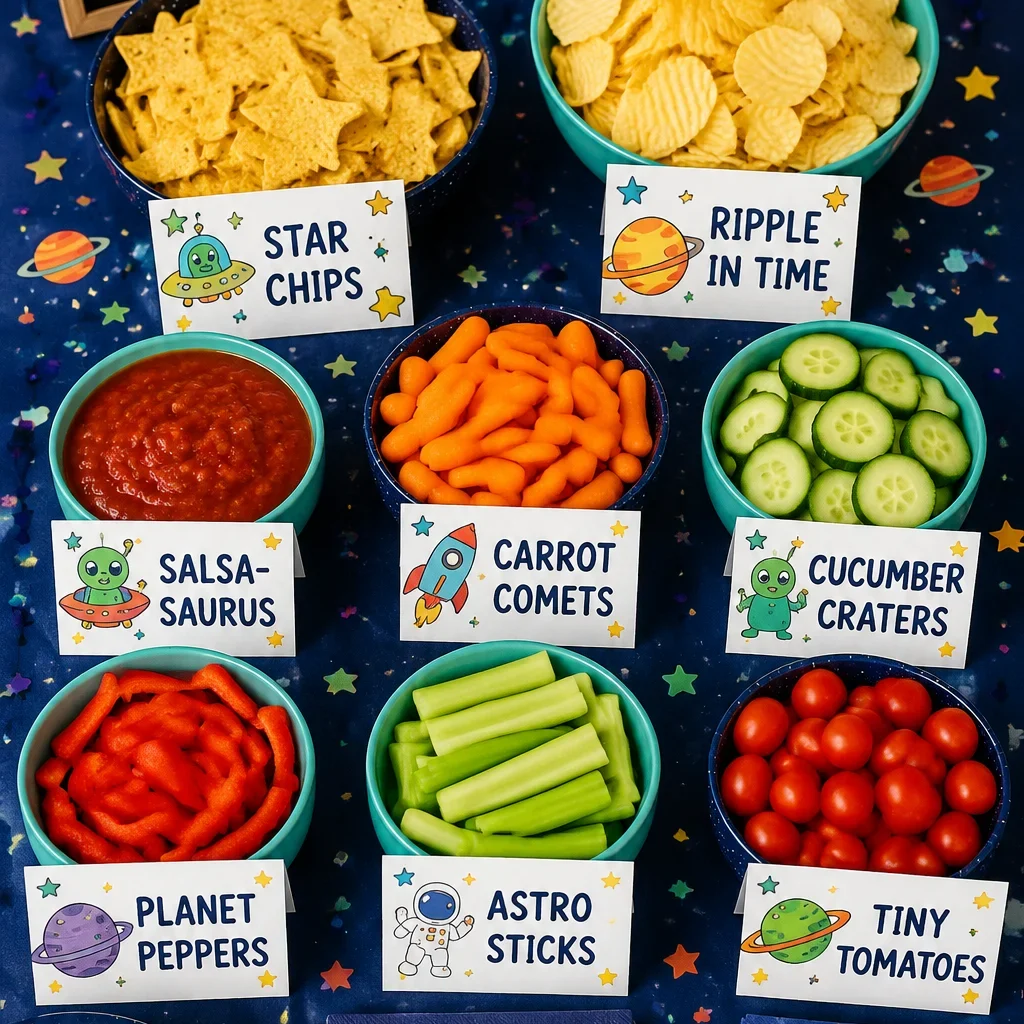
This is a tiny detail that makes a huge difference in how a party looks. Label every single item on your snack table with a printed tent card — but give each snack a fun, themed name. Chips become ‘Birthday Bites.’ Strawberries become ‘Berry Sweet.’ Popcorn becomes ‘Pop, Pop, Hooray!’ It takes 20 minutes to make the labels and zero extra money, but guests laugh and love it, and suddenly your Costco snacks look like they were catered.
Use a free design tool like Canva to create matching tent card labels in your party colors. Print on cardstock, fold in half, and they stand up perfectly on their own. Keep the font fun and readable, and use a consistent color scheme that matches the rest of your party. These tiny cards signal that someone put thought into the details — and that perception is what makes a budget party feel like a premium one.
19. Mylar Balloon Bouquets
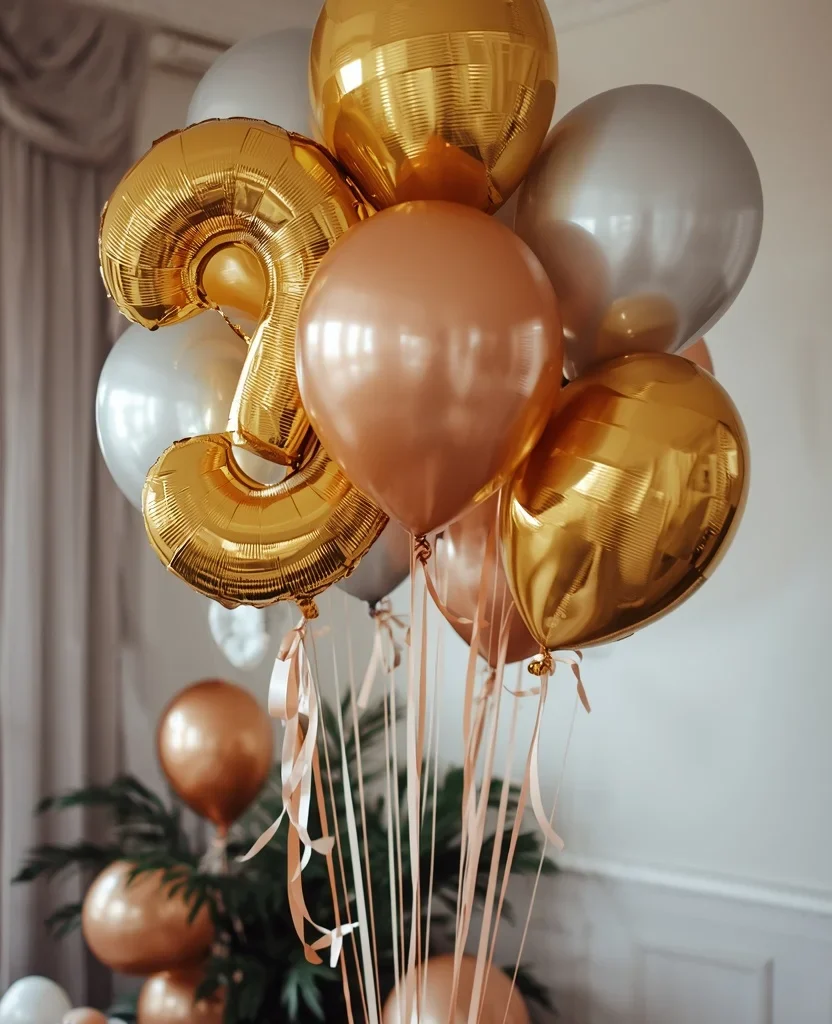
A cluster of mylar (foil) balloons in metallic shades looks genuinely luxe and is easier to arrange than latex bouquets because they hold their shape on their own. Mix sizes — a large star or round balloon paired with a number balloon and two smaller round balloons — and tie them together with a ribbon. Anchor the bunch to a table leg or a small weight, and you’ve got an instant party focal point for about $10.
The metallic finish is what photographs so beautifully — gold and rose gold especially catch light in a way that looks incredible on camera. Use them as table anchors, near the entrance, or alongside the cake table. Unlike latex balloons, mylar balloons last for days (sometimes weeks), so you can buy them the day before without worrying about deflation. One cluster per table goes a long way.
20. ‘Pin the Tail’ Style Games
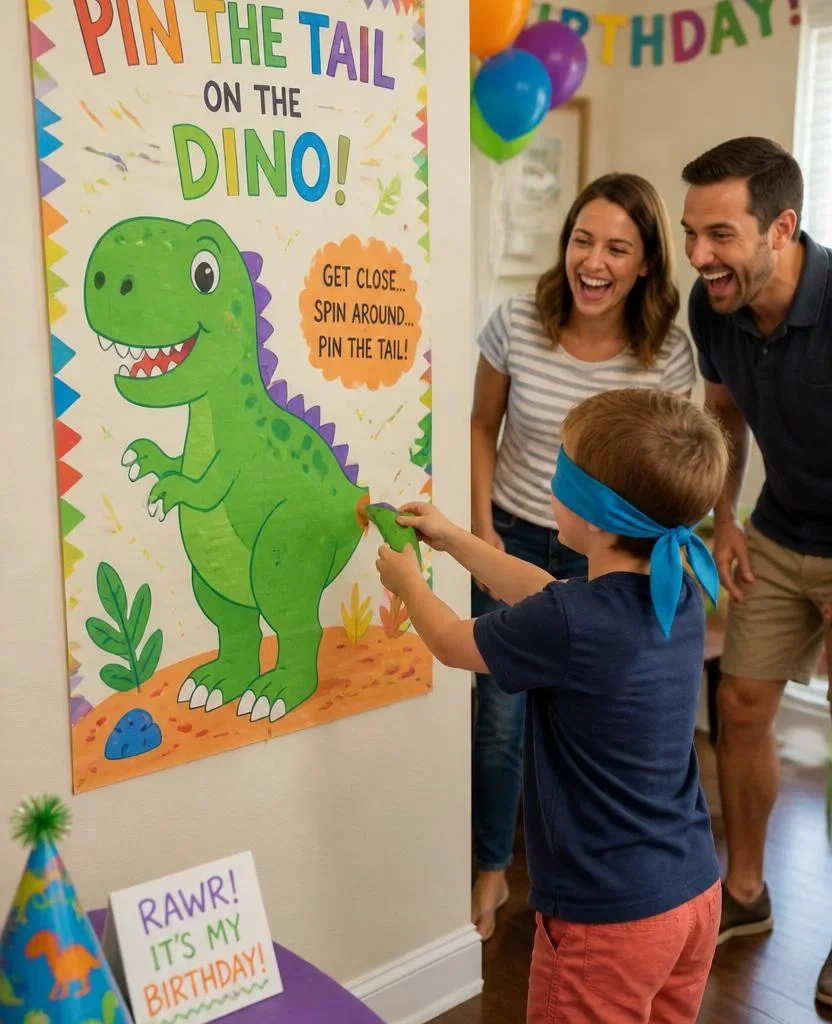
Classic party games like pin-the-tail-on-the-donkey never go out of style because kids (and honestly, adults) love them. You can make a themed version of this game for any party: pin the crown on the princess, pin the horn on the unicorn, pin the tail on the dinosaur. All you need is a large printed or hand-drawn poster and some paper pieces with tape. It costs almost nothing and creates the kind of chaotic fun that everyone remembers.
Make it extra fun by printing the results as a moment — take a photo of each person mid-game with their piece stuck in some ridiculous location. Compile them into a quick slideshow at the end of the party for a huge laugh. This kind of silly, low-tech fun often ends up being what guests talk about weeks after the party. You don’t need expensive entertainment when you have a blindfold and a poster.
21. Themed Punch Bowl Station
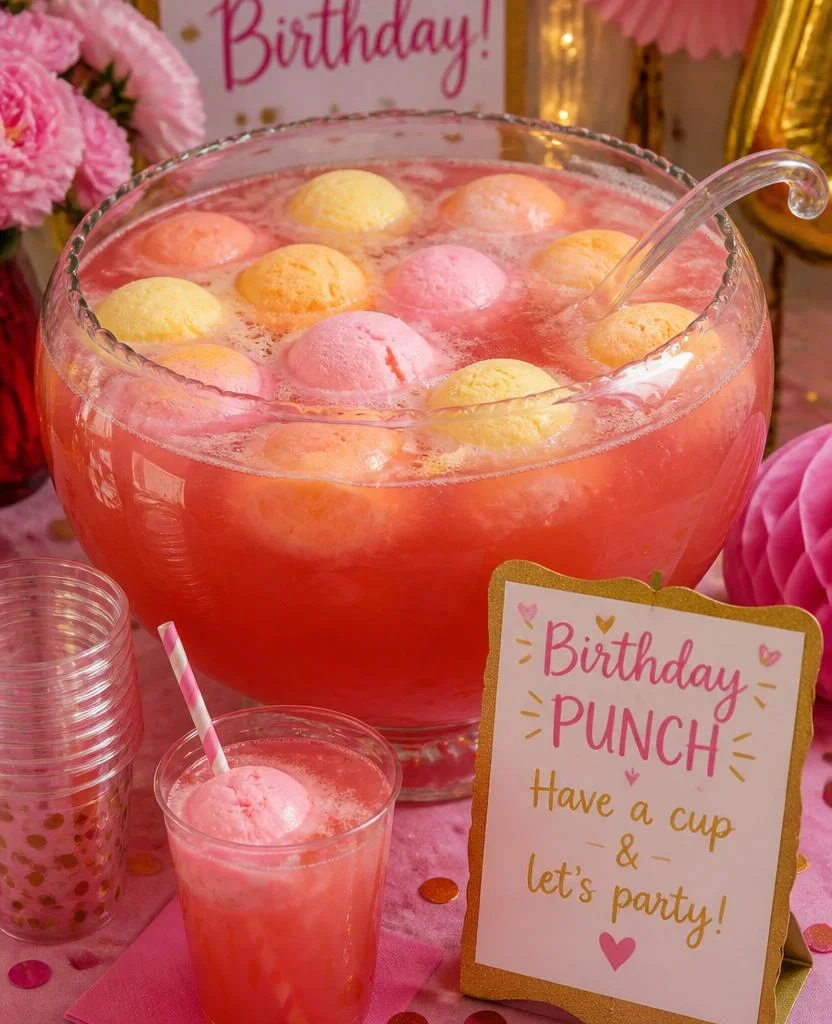
A festive punch bowl is one of the most underrated party upgrades out there. Mix lemonade, ginger ale, and sherbet (or sorbet) in a big, clear bowl, and you’ve got a fizzy, colorful, crowd-pleasing drink that looks fancy and costs almost nothing. Add a few sliced citrus rounds or frozen berries floating on top, and it looks like something from a catered event. Serve it with a ladle and a stack of cups, and guests will hover around it all night.
Label it something fun — ‘Birthday Brew,’ ‘Fairy Fizz,’ ‘Party Potion’ — and put a little handwritten or printed sign next to the bowl. Match the sherbet or juice color to your party theme (raspberry for pink, mango for orange, lime for green) for extra visual consistency. A punch station also removes the need to constantly refill individual drinks, which means less work for you during the party. Win-win.
22. Dollar Store Décor Haul
Honestly, the dollar store is an underrated party styling resource, and people who skip it are leaving money on the table. Glass candle holders, ribbon, paper fans, small frames, plastic gems, artificial flowers, cellophane bags, small chalkboards — all available for $1.25 each. When you style these items together with intention, the result looks nothing like dollar store finds. It looks like you curated a cohesive party aesthetic.
The strategy is to shop with a color story in mind. Decide on your two or three party colors before you go, then buy only items in those shades. This discipline is what transforms a random mix of cheap items into a styled party. Avoid buying too many ‘birthday’ labeled items in different fonts and styles — they create visual clutter. Stick to solids, metallics, and simple shapes, and let your color palette do the talking.
23. Homemade Cake Pops or Cookie Favors

Cake pops look artisan and fancy and are shockingly simple to make. Crumble a baked cake (box mix is fine), mix it with frosting, roll into balls, chill them, dip in melted chocolate wafers, and decorate with sprinkles. That’s it. Each pop costs about 25–50 cents to make, and they look like they came from a boutique bakery. Display them in a piece of foam wrapped in paper or ribbon, and they become a dessert display all on their own.
Alternatively, bake a batch of simple sugar cookies and dip or decorate them in your party colors. Cookie cutters in birthday shapes (stars, numbers, balloons) make this super easy. Package individual cookies in cellophane bags tied with ribbon as both dessert and favor — one item, two purposes. This kind of edible favor always lands well because guests actually use it and appreciate the homemade effort.
24. A Thoughtful Party Program or Menu Card
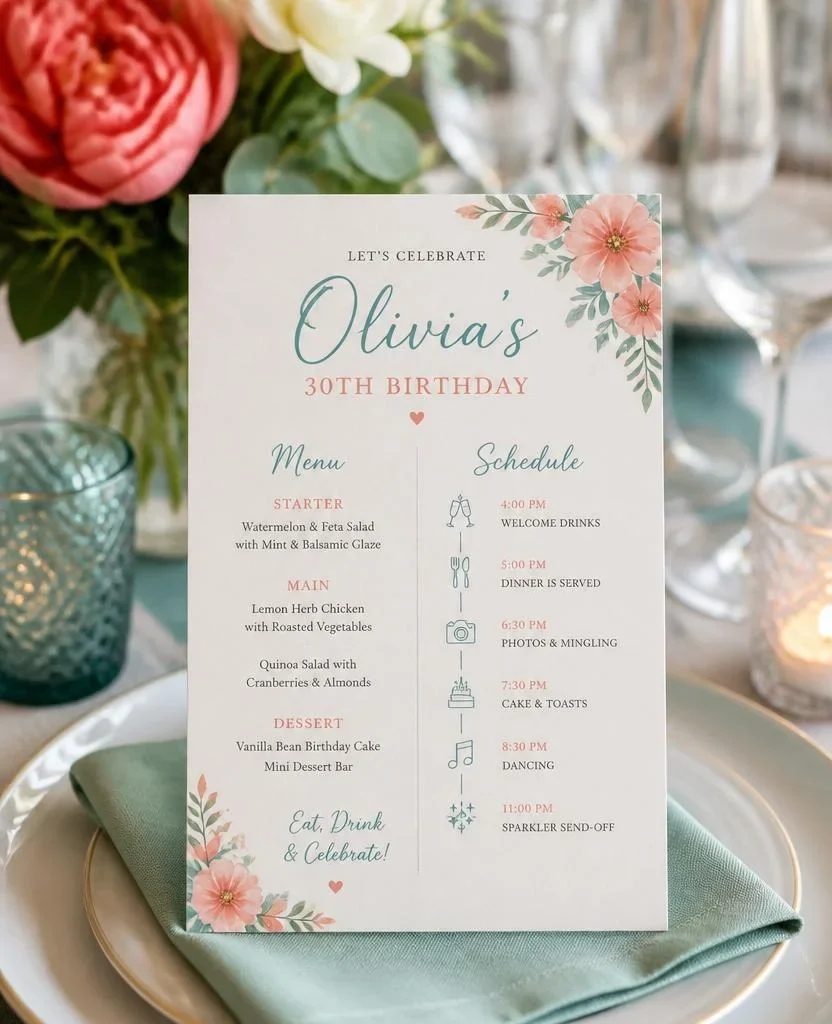
This is the detail that separates a truly thoughtful party from a generic one. A simple printed menu card or party program placed at the table (or at the entrance) signals that you planned this event with care. Include the menu, a timeline of activities, or just a ‘welcome’ message from the birthday person. It takes 20 minutes to design in Canva and a few cents to print, and it makes guests feel like they’ve been welcomed somewhere special.
Design it to match your party color scheme and use a clean, readable font. Frame it in a small dollar-store frame or prop it up in a card holder for a finished look. Guests will pick it up, read it, and feel the intentionality behind it. It’s the smallest possible detail, but it communicates ‘this person put real thought into this party’ — which is ultimately what makes any celebration feel memorable, regardless of the budget.
The Bottom Line
Budget birthday parties that look expensive all share one thing in common: intention. When you shop with a color palette, style with height and layers, and add personal touches like labels, garlands, and handmade elements, the result looks curated — not cheap. You don’t need to spend more; you just need to spend smarter. Pick five or six ideas from this list, commit to a cohesive theme, and watch your party go from ‘nice’ to ‘how did you do all this?’
Now go plan that party. You’ve got this.

One Comment