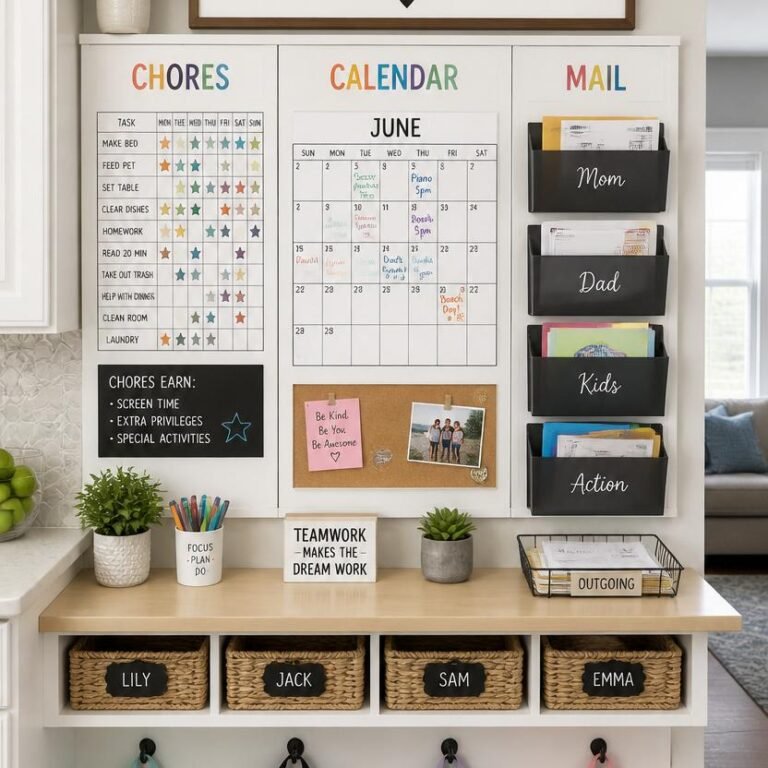
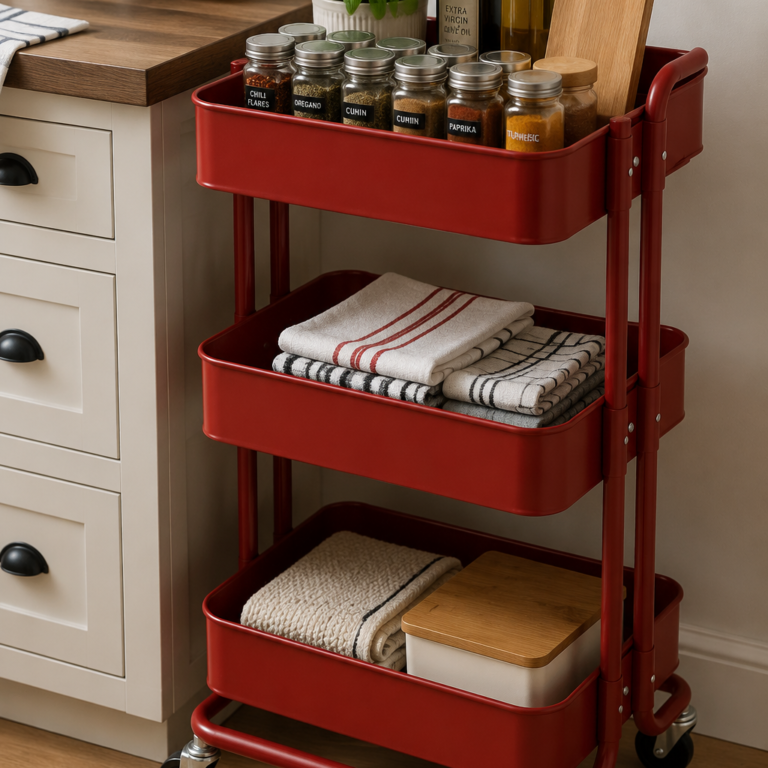
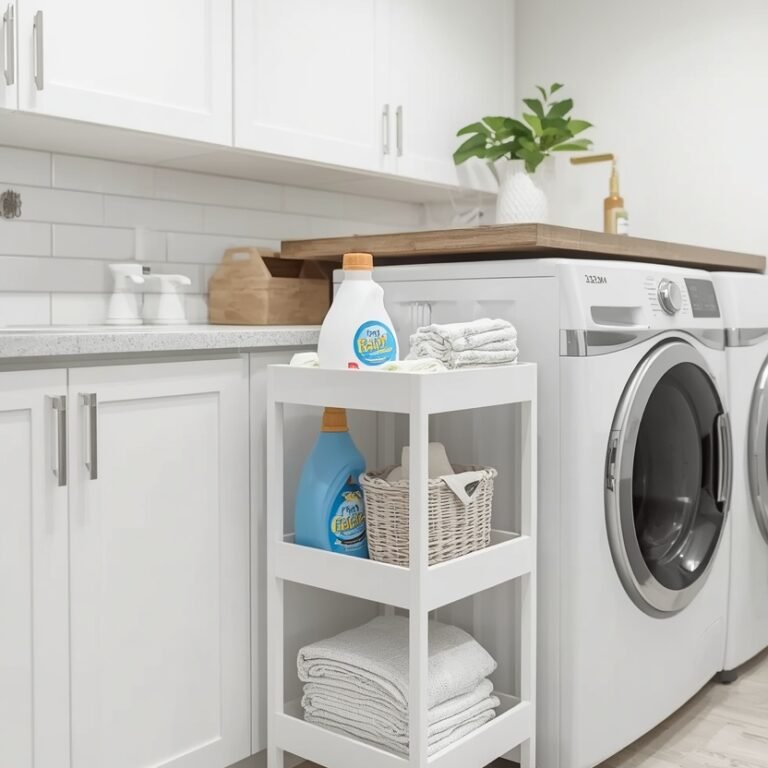
23 Freezer Drawer Organization Hacks

Introduction

You open your freezer drawer to grab something quick and — bam — an avalanche of mystery bags, frost-covered containers, and that one chicken breast you\’ve been \”meaning to use\” since last February. Sound familiar? I\’ve absolutely been there, and I\’m telling you, life on the other side of a well-organized freezer drawer is genuinely better. These freezer drawer organization hacks will help you reclaim every inch of that cold real estate, cut food waste, and save you from the frozen abyss once and for all.

Table of Contents

Use Flat Freezer Bags and Stack Them Like Files

This is the single best freezer hack that nobody tells you about early enough. Flatten your food inside zip-lock freezer bags before freezing — soups, sauces, marinated meats — then stand them upright like files in a drawer. You can suddenly fit three times as much in the same space and see every single bag without digging. It takes an extra 60 seconds when you\’re prepping, and it pays off every time you open that drawer.
The key is freezing flat first: lay bags on a baking sheet, freeze solid, then stand them up. Once they\’re rigid, they stay perfectly organized and won’t tip or collapse. Label each bag on the flat side with a marker so the label faces you when it\’s standing upright. This system works especially well for meal-prep routines. Honestly, once you start doing this, going back feels criminal.

Add Drawer Dividers or Tension Rods

Tension rods aren\’t just for closets — they work brilliantly inside freezer drawers to create separate zones. Pop two or three across the drawer and you instantly get organized compartments for different food categories: proteins in one zone, frozen vegetables in another, ready meals in the third. No special purchases needed.
The beauty of this system is that everything stays where you put it. No more shuffling the whole drawer to find that one item buried at the back. You can also use plastic drawer dividers if you want something more permanent. Zoned drawers are a complete game-changer.

Label Everything — Seriously, Everything

If you\’ve ever played \”what is this frozen mystery block?\” then you already know why labeling matters. Every item needs a label with what it is and when you froze it. Masking tape and a marker work perfectly.
Go a step further and add cooking instructions or portion sizes. Dating your food helps you rotate properly and avoid waste. Label now, thank yourself later.

Bin and Basket Grouping System

Small clear plastic bins inside your freezer drawer are an absolute revelation. Group similar items together so you can pull out an entire category at once instead of rummaging.
Clear bins let you see everything instantly and keep things contained. Measure your drawer before buying so everything fits snugly. This system is simple but incredibly effective.

FIFO Method — First In, First Out

Always place newer items at the back and move older ones to the front so they get used first. It sounds simple, but it dramatically reduces food waste.
Pair this with date labels and you\’ll maintain a perfectly rotating freezer with minimal effort. This one habit alone makes a huge difference.

Freeze in Meal-Sized Portions

Divide food into single-meal or family-meal portions before freezing. It saves time, reduces waste, and makes cooking easier.
Smaller portions also stack better and keep your drawer organized. Once you start doing this, weeknight meals become effortless.

Use a Freezer Inventory List

Keep a running list of what\’s in your freezer. It can be on your phone, a whiteboard, or a printed sheet. Update it regularly.
This helps with meal planning and prevents buying duplicates. It’s simple but incredibly effective.

Vacuum Seal for Space and Freshness

A vacuum sealer removes air, saving space and preventing freezer burn. Food lasts much longer and stores more efficiently.
Vacuum-sealed bags stack neatly and maximize drawer capacity. If you freeze often, it’s worth the investment.

Dedicate Zones by Food Category

Assign specific areas of your drawer to different food types. Stick to those zones consistently.
This makes everything easy to find and maintain. Once set up, the system runs on autopilot.

Store Ice Cream Containers Upside Down

Storing ice cream upside down helps prevent ice crystals from forming. It keeps the texture smooth and easier to scoop.
Just make sure the lid is sealed tightly before flipping.

Use Silicone Molds for Portion Freezing

Freeze soups, sauces, or liquids in silicone molds, then store the frozen portions in bags.
This creates perfect portion sizes and saves space compared to bulky containers.

Keep a Use First Section

Designate a front section of your drawer for items that need to be used soon.
This removes guesswork and helps reduce waste by making priorities obvious.

Square Containers Over Round Ones

Square and rectangular containers maximize space and stack neatly.
Round containers waste space and create clutter. Switching makes a big difference.

Pre-Freeze Produce on a Sheet Pan

Freeze fruits and vegetables individually on a tray before storing them.
This prevents clumping and makes it easier to grab small portions.

Use Magazine Files as Dividers

Plastic magazine holders work perfectly for organizing flat frozen bags upright.
They keep categories separated and easy to access.

Freeze Broth in Zip Bags Lying Flat

Store broth in flat zip bags instead of bulky containers.
They stack easily and thaw quickly, saving both time and space.

Color-Code Your Labels by Category

Use different colored tape for different food types.
This makes identifying items quick and intuitive without reading labels.

Freeze Herbs in Olive Oil Ice Cubes

Chop herbs, freeze them in oil using ice cube trays, and store in bags.
You get instant flavor portions with zero waste.

Dedicate a Drawer Section to Breakfast Items

Keep all breakfast foods in one area.
This makes mornings faster and keeps your drawer organized.

Squeeze Sauces Into Flat Bags

Store sauces in flat bags instead of jars.
They take up less space and thaw quickly when needed.

Do a Monthly Freezer Audit

Spend 15 minutes each month checking dates, reorganizing, and updating your inventory.
Regular maintenance prevents major clutter from building up.

Freeze Bread and Baked Goods Sliced

Pre-slice bread before freezing so you can grab only what you need.
It saves time and prevents waste.

Use a Whiteboard on the Freezer Front

Attach a small whiteboard to track contents and meal ideas.
It keeps everything visible and organized for the whole household.

Conclusion

There you have it — freezer drawer organization hacks that range from simple habits to smart upgrades. You don’t need to do everything at once. Start with a few changes and build from there.
A well-organized freezer means less waste, easier meals, and way less frustration. Your future self will be very glad you made the effort.

24 Paper Organization Ideas for Home Office

Your desk looks like a filing cabinet exploded, and you’ve been “meaning to sort it out” since 2022. No judgment here — I’ve been there too. Let’s fix it with 24 ideas that actually work, not the ones that look good on Pinterest and collect dust in real life.

Accordion File Folders

If you haven’t discovered accordion file folders yet, where have you been? These are honestly the MVP of paper organization. You get multiple labeled pockets in one compact unit, which means no more stacking random papers in a pile and pretending they’re “sorted.” I grabbed mine for under $10, and it changed my entire desk situation.

The best part? You can organize by month, project, or category — whatever works for your brain. IMO, going with a monthly setup is the easiest starting point. Label January through December, drop your papers in as they come, and revisit at the end of each month. It\’s simple, it\’s fast, and it keeps the paper avalanche from burying your keyboard.

Stackable Letter Trays

Stackable letter trays are the “old reliable” of paper organization — and for good reason. You can set up an in-tray, a pending-tray, and an out-tray system in seconds. The vertical stacking keeps your desk footprint tiny while giving you a visual priority system that actually works without any effort.

Pro tip: don’t let any tray become a black hole. Set a rule — if a paper sits in the in-tray for more than a week without action, it either gets filed or tossed. That single habit alone will save you hours of future searching. Trust me, future-you will send back a thank-you note

Magazine File Holders

Magazine file holders aren’t just for magazines — who knew, right? These upright holders are perfect for grouping thick document stacks by project or client. Line them up on a shelf, slap a label on each one, and suddenly your office looks intentional instead of chaotic. They’re cheap, stackable, and come in every aesthetic under the sun.

I personally use six of these on my bookshelf — one per active project. When a project wraps up, I pull the whole holder, archive what’s needed, and shred the rest. The physical act of “closing” a file holder feels weirdly satisfying, like finishing a chapter. Give it a try and see if it works for you.

Hanging File Folders in a Drawer

If you have a deep desk drawer just sitting there collecting phone chargers and mystery pens, convert it into a mini filing cabinet with hanging file folders. All you need is a hanging file frame (most office supply stores carry them) and a set of folders. Drop them in, label each one, and that drawer becomes your most productive square foot.

Color-coding your hanging folders by category takes this up a notch. Bills in red, client docs in blue, receipts in green — you get the idea. When everything has a color, your eyes find the right folder almost automatically. That’s the kind of brain-friendly system that sticks long-term without any willpower required.

The A-Z Filing Method

Sometimes the classic approach wins. An alphabetical filing system works beautifully when you have a wide variety of documents with no clear category grouping. Name each folder by the first letter of the subject, person, or company — and when you need a document, you know exactly where to start looking without overthinking it.

The A-Z method shines for anyone who deals with lots of vendors, contacts, or reference materials. The only real trick? Be consistent with how you name things. Decide upfront whether you file “AT&T” under A or T, and stick with it. Inconsistency is what turns a good system into a guessing game three months down the line.

The Action-Based Filing System

Not all papers deserve equal treatment — some need immediate action, some are waiting on someone else, and some are just for reference. An action-based system sorts by what needs to happen next, not by subject. Your three main folders: To-Do, Waiting On, and Reference. That’s it. Simple wins every time.

This system plays incredibly well with the GTD (Getting Things Done) productivity method if you\’re into that world. Every paper that lands on your desk gets sorted into one of those three buckets within 60 seconds. No deliberating, no “I’ll sort this later” piles. The 60-second rule is the whole secret — fast decisions prevent clutter.

Color-Coded Filing

Color-coding isn’t just fun — it’s genuinely faster than reading labels when you’re in a rush. Assign a color to each major life category: finances, health, work, home, and personal. When you open the drawer, your eyes scan for the right color before your brain even processes words. It’s surprisingly effective and weirdly enjoyable to set up.

FYI, you don’t need to buy 14 different colored folders to make this work. Even just four or five distinct colors make a noticeable difference. Stick with whatever color-to-category mapping feels intuitive to you — there’s no universal standard, and you’re the one who needs to remember it at 9 AM before coffee.

The Tickler File System

Ever heard of a tickler file? It sounds weird, but it\’s a time-based reminder system made entirely of paper folders. You create 43 folders: 31 for days of the current month and 12 for future months. Drop a document in the folder matching the day you need to deal with it. Each morning, open that day\’s folder and you know exactly what needs your attention.

This system is especially powerful for people who receive physical mail, invoices, and time-sensitive documents. It eliminates the “I forgot about that” problem because the system reminds you automatically. Setting it up takes about 30 minutes, but saves you from dozens of “oh no, that was due yesterday” moments every year.

Dedicated Inbox & Outbox Zone

Define a physical inbox spot on your desk and commit to it. Every single piece of paper that enters your office goes there first — no exceptions. Bills, notes, mail, printouts — all of it. This one habit single-handedly prevents random paper piles from forming in random corners like paper tumbleweeds.

Pair it with an outbox: a spot for papers that are done and need to leave your desk (to be mailed, shared, or archived). The two-tray combo creates a clear flow — things come in, get processed, and move out. Your desk surface stays clear, your mind stays clear, and you actually know where everything is. Revolutionary, I know.

Desk Drawer Dividers for Paper Supplies

Your paper organization tools — sticky notes, notepads, envelopes, paper clips — deserve their own organized home, too. Drawer dividers keep your paper supplies separated and instantly accessible instead of jumbled together in a drawer you dread opening. Bamboo dividers are my personal favorite because they\’re sturdy and look good even when the drawer is open.

Assign one section per supply type. When you reach for a sticky note, you grab it and get on with your life — no digging through rubber bands and old receipts to find it. It sounds trivially small, but these tiny frictions add up over the course of a workday. Remove them wherever you can, and your focus will thank you.

A Dedicated “Currently Working On” Spot

Keep a small, clearly defined spot for the papers tied to your current active task. A compact desktop file holder works perfectly — just two or three slots for the folders you’re actively working through today. Everything else stays filed away, out of sight and out of mind, so you can focus on what actually matters right now.

The goal is to keep your active workspace as close to empty as possible, except for what’s relevant to this moment. When you finish a task, those papers go back into the filing system immediately — no lingering. This “single focus” paper zone is one of the simplest productivity habits I’ve ever adopted, and the payoff is immediate.

Paper Sorter with Multiple Slots

A multi-slot paper sorter is ideal when you juggle several ongoing projects or clients simultaneously. Each slot gets a label, and papers go directly into the right slot when they arrive. No sorting pile, no “I’ll deal with this later” stack. The sorter does the sorting for you if you use it consistently.

Wire mesh sorters are my top pick because you can see the label and the paper at a glance without pulling anything out. Some people prefer solid-sided ones for a cleaner look, and that’s totally valid. Pick whatever you’ll actually use — the best organizer is always the one you’ll maintain long-term, not the prettiest one on Amazon

Wall-Mounted File Pockets

Move your filing off the desk and onto the wall with wall-mounted file pockets. These hang directly on the wall and free up your entire desk surface while keeping important papers within arm\’s reach. Mount three to four of them in a column, label them, and you\’ve created a paper command center that takes zero desk space.

This works especially well near your desk for frequently referenced documents — project briefs, reference sheets, active invoices. Wall space is almost always underused in home offices, so putting it to work feels like finding a bonus room you didn\’t know you had. Don\’t sleep on vertical real estate — it\’s your most underrated organizational ally.

Pegboard with File Holders

Pegboards have exploded in popularity for home offices, and for good reason — they\’re infinitely customizable. Add file holder attachments to your pegboard, and you get a modular paper organization station that you can rearrange whenever your workflow changes. No drilling extra holes, no commitment to a fixed layout.

Beyond just file holders, a pegboard lets you keep scissors, tape, pens, and small tools within reach, too. Everything your paper-wrangling workflow needs lives in one vertical footprint on the wall. Set one up once, and you’ll wonder how you ever managed without it. Seriously — this is one of those upgrades that feels way more impactful than it has any right to be.

Corkboard for Active Reference Papers

A corkboard is the perfect home for papers you need to see, not file. Checklists, project timelines, reference contacts, current deadlines — pin them up where you can see them at a glance without shuffling through stacks. Out of sight really does mean out of mind, so keep your most active reference material visible.

Keep the corkboard intentional — don’t let it become a visual dumping ground. A good rule: if something has been pinned up for over two weeks without being referenced, it probably belongs in a file or the shredder. Treat it like prime real estate and only give space to what’s earning its spot right now.

Floating Shelves with Labeled Bins

Floating shelves give you storage without furniture bulk. Add a few labeled bins or baskets on your floating shelf, and you have a paper storage solution that looks intentional rather than cluttered. Match the baskets to your room’s aesthetic, and it doubles as decor — productivity and style, coexisting peacefully.

I use two floating shelves above my desk: one holds current project bins, the other holds archival bins by year. When a year ends, those documents go into storage boxes and off the shelf. The visual simplicity of that shelf keeps my mental load light — I know exactly what\’s up there and exactly where to look when I need something.

Scan and Shred Workflow

The most powerful paper organization strategy? Having less paper in the first place. A scan-and-shred workflow means every document that doesn’t legally need to be physical gets scanned, saved digitally, and shredded. A good portable scanner pays for itself fast when you factor in the space and mental energy you reclaim.

Scan documents the moment they arrive, before they even have a chance to form a pile. Name the file clearly (date-category-description format works great), save it to the right folder in your cloud storage, and shred the original. This habit alone can reduce your physical paper volume by 70-80%. That’s not a typo — it’s genuinely that impactful.

Cloud Storage with a Clear Folder Structure

Digital clutter is just as real as physical clutter — a disorganized cloud drive is as useless as a pile of unsorted papers. Build a clear, consistent folder structure in your cloud storage (Google Drive, Dropbox, OneDrive — your pick) that mirrors your real-world filing categories. Once the structure is solid, scanning and saving become effortless.

Main folders should be broad: Finance, Work, Health, Home, and Personal. Each main folder gets sub-folders by year or project. The goal is that any document can be found within three clicks — if it takes more than that, your structure needs simplifying. A system you can navigate sleepily at 7 AM is the right system

Go Paperless for Bills and Statements

Here’s the most obvious advice that most people still haven’t acted on: switch every bill, bank statement, and recurring notice to paperless delivery. Log into each account, flip the paperless switch, and eliminate that entire category of physical paper from your life permanently. It takes one hour once and saves you monthly forever.

After going paperless on utilities, banking, insurance, and subscriptions, I reduced my incoming paper by more than half overnight. The remaining paper that comes through is either important mail, packages, or things I actually printed myself. Controlling the source of paper is more powerful than any organizer you could buy.

Use a Mobile Scanning App

You don’t need a dedicated scanner to go digital — your phone already has a scanning app built in (or you can download one for free). Apps like Adobe Scan, Microsoft Lens, or even your phone’s native Notes app can scan, enhance, and save a document in under 30 seconds. That’s faster than finding a physical file folder.

I use my phone scanner for receipts, handwritten notes, signed documents — anything I’d otherwise toss in a ” to be sorted” pile. The key is scanning immediately and saving to the right folder right then, not parking it in a downloads folder you\’ll forget about. Immediate action is what separates a good system from digital clutter.

The Daily Paper Sweep

Set aside five minutes at the end of every workday for a paper sweep. Pick up every loose paper on your desk, make a fast decision — file it, scan it, action it, or toss it — and clear the surface before you close your laptop. That’s it. Five minutes, every day, non-negotiable.

This habit prevents the slow accumulation that leads to overwhelming piles. A pile of papers is almost always just a collection of five-minute decisions that got postponed. When you handle each one as it comes, you never face the mountain. And honestly? Starting your next workday with a clear desk is one of the most underrated feelings in home office life.

Weekly Paper Review Session

Once a week, Friday afternoon works great for most people — do a dedicated 15-minute paper review. Go through your inbox tray, process any papers that didn’t get handled during the week, update your filing, and confirm your action-based folders are current. Think of it as your weekly paper reset.

The weekly review also lets you catch things that slipped through the daily cracks before they become problems. An invoice that almost got missed, a form you forgot to mail — the weekly review is your safety net. Pair it with a cup of coffee and your favorite Friday playlist, and it stops feeling like a chore real fast.

The One-In-One-Out Rule

Apply the one-in-one-out rule to paper: every time a new document enters your filing system, ask whether an older document in that same category can be retired, shredded, or archived. This keeps your filing from slowly ballooning while still maintaining everything current. It’s a gentle ongoing curation rather than a stressful annual purge.

This rule works especially well for categories that renew regularly — insurance policies, utility bills, tax documents. When the new one arrives, the old one often has zero reason to stay. Check what your legal retention requirements are for each document type (some things need to be kept longer than others), then let the rest go confidently.

Annual Purge and Archive Day

Once a year — January works well since it naturally feels like a reset — do a full paper audit. Go through every folder, every bin, every shelf. Archive what’s legally required to keep, scan and shred what can go digital, and toss what’s genuinely unnecessary. The whole thing takes two to three hours, but feels incredible when it’s done.

I do my annual purge on New Year’s Day with background music and zero apologies to anyone who thinks that’s a weird holiday activity. A fresh filing system going into a new year means less friction for the next 12 months. Treat it like maintenance on a car — you don’t enjoy it every time, but you definitely notice when you skip it.

Final Thoughts: Pick Two, Start Today

You don’t need all 24 ideas to transform your home office — you just need the right two or three for where you are right now. Start with your biggest pain point: if papers pile up on the desk, build your inbox habit first. If you can never find documents when you need them, tackle your filing system. Small, specific improvements compound fast.

The truth? Paper organization isn’t a one-time fix — it’s a system you maintain. But once you have the right structure in place, maintenance takes minutes, not hours. Set it up thoughtfully once, follow through with a few simple daily habits, and your home office will stop feeling like a battle zone.

Now close this tab and deal with that pile on your desk. You’ve got everything you need.

20 DIY Cork Board Ideas for Organization

A corkboard might just be the most underrated organization tool you already own — or desperately need.”

Let’s be honest — sticky notes on your monitor and papers piled on your desk are not a system. They\’re a cry for help. I know because I\’ve been there, buried under a mountain of receipts and forgotten to-do lists. Then I discovered what a DIY corkboard can really do, and my entire home office transformed. Spoiler: it didn\’t cost much, and it looked incredible.

From simple memo boards to full-blown command centers, cork boards are wildly versatile. Whether you need to organize your kitchen, bedroom, or workspace, there\’s a corkboard setup on this list that was practically made for you. Here are my favorite 20 DIY cork board ideas that actually work — and look great doing it.

Pro Tip: Standard cork tiles, a hot glue gun, and some washi tape cover nearly every idea on this list. IKEA and dollar stores stock affordable cork sheets year-round.

Classic Framed Cork Memo Board

\"\"

The classic framed cork memo board is the one that started it all — and it still holds up. Pick up a simple shadow box or picture frame, back it with a cork sheet, and you\’ve got an instant pinboard that looks intentional rather than improvised. The frame elevates the whole thing from “random board on a wall” to “actual design element.”

Fabric-Covered Cork Board

\"\"

A fabric-covered corkboard is what happens when a memo board gets a glow-up. Stretch fabric over your cork surface, secure it at the back, and you’ve got a custom look that matches your space perfectly.

Washi Tape Grid Cork Board

\"\"

Apply washi tape in a grid pattern to create sections for tasks, inspiration, and notes. It transforms your board into a structured system while looking clean and aesthetic.

Giant Wall-to-Wall Cork Board

\"\"

Cover an entire wall with cork tiles for a massive planning surface. Perfect for creatives, entrepreneurs, or anyone juggling multiple projects.

Painted Ombre Cork Board

\"\"

Blend acrylic paints across your cork board for a soft gradient effect. It doubles as decor while staying fully functional.

Cork Board Weekly Planner

\"\"

Divide your board into seven sections for each day of the week. Use color-coded notes to organize tasks, appointments, and goals.

Cork Board Photo Wall

\"\"

Create a memory display with photos, notes, and keepsakes arranged organically. Add string lights or twine for extra warmth.

Kitchen Command Center Cork Board

\"\"

Use a corkboard in the kitchen to organize meal plans, grocery lists, and schedules. It keeps everything in one visible place.

\"\"

Arrange hexagon cork tiles in a honeycomb pattern for a modern gallery wall. Each tile acts as its own mini board.

Rustic Wood Frame Cork Board

\"\"

Use reclaimed wood to build a chunky frame around your cork board for a farmhouse-style aesthetic.

Cork Board Vision Board

\"\"

Fill your board with images, quotes, and goals. It’s a powerful and affordable way to stay focused on what you want.

Chalkboard and Cork Combo Board

\"\"

Split a board into two halves: one chalkboard, one cork. Perfect for writing and pinning in one place.

Cork Board Kids’ Art Display

\"\"

Mount a board at child height so kids can display their artwork. It turns their creations into a rotating gallery.

Cork Board Recipe Holder

\"\"

Keep recipes visible while cooking by pinning them to a kitchen cork board. Add protective sleeves for frequently used cards.

Pegboard-Style Cork Board with Hooks

Add screw-in hooks to a thick corkboard for hanging keys, tools, or accessories alongside pinned notes.

Vintage Map Cork Board

\"\"

Attach a map to your corkboard and use pins to mark places you’ve visited or want to go.

Cork Board Mood Board for Designers

\"\"

Use corkboards to pin fabric swatches, color palettes, and inspiration for creative projects.

Cork Board Jewelry Organizer

\"\"

Hang necklaces on pins or hooks and push earrings directly into the cork for a tangle-free display.

Cork Board Study Zone for Students

\"\"

Organize class schedules, deadlines, and notes in one visible place above your desk.

Upcycled Pallet Wood Cork Board

Use reclaimed pallet wood to create a rustic, eco-friendly corkboard frame that costs almost nothing.

Get Organized — One Cork Board at a Time

\"\"

There you have it — 20 DIY cork board ideas that cover every room, every style, and every type of organizational need. The best part? Almost every idea on this list costs under $30 and can be done in an afternoon.

Cork boards are one of the rare tools that are both functional and beautiful. Pick one idea, gather your materials, and make it happen. Your future self — the one who always knows where the keys are — will thank you.